|
CHECK OUT THE ROADSTERCYCLE HOME PAGE.

REMEMBER WHEN YOU JUMP START A BIKE WITH A CAR," THE CAR CANNOT BE
RUNNING" !!!
YOU CAN FRY YOUR R/R IN A HEARTBEAT IF
IT IS!!!!!!!
Stator Testing Example
Courtesy of John Lorenz-(
John (on left) and Big Daddy Don Garlits).
John really knows his stuff and has put together a little testing help for all
of
us and it is greatly appreciated. His drag racing record holding 750 Triumph
is in Don Garlits racing Museum. A 10 second stock bore Triumph!!!
Alternator check (permanent magnet type):
This is the most commonly found system in motorcycles that have 2 or 3 wire
stators. The rotor (the spinning magnet inside the center of your stator) is
almost always fine unless it's physically damaged. First do an
ohms test on the stator using your bikes manual. However, I have seen
alternators that can have the correct ohm reading, but not put out ample current
(Wattage). If you think this may be your case you can also do a "wattage
test". Connect a 100 watt lamp ( you have to use a 100 watt bulb not a new
energy saving curly fluorescence) directly to any two alternator wires. You will
have to cut off the end of the lamp cord and put on terminals that fit into your
stator connector. Most alternators should get this size bulb pretty bright by
raising your RPMs up a bit.... By using this method, you will have lot better
assurance that the alternator can produce both voltage and current
(Wattage).
Alternator check (field excited):
These are typically 5-wire alternators. (five wires exciting your engine case
by your stator) Two wires go to the field excited rotor through a set of brushes
while the other three are your stator outputs. Again it's a good idea to do an
ohms test on your stator using your bikes manual. After that if it passes you
can apply 6 volts (12 volts can be used, but 6 is plenty) to the rotor field
wires using a 6 volt battery charger. This magnetizes the rotor to make the
alternator work. Then can perform the same wattage test using a 100 watt lamp as
described above.
A special thanks to John for providing his knowledge of Alternators to all of
us. Jack
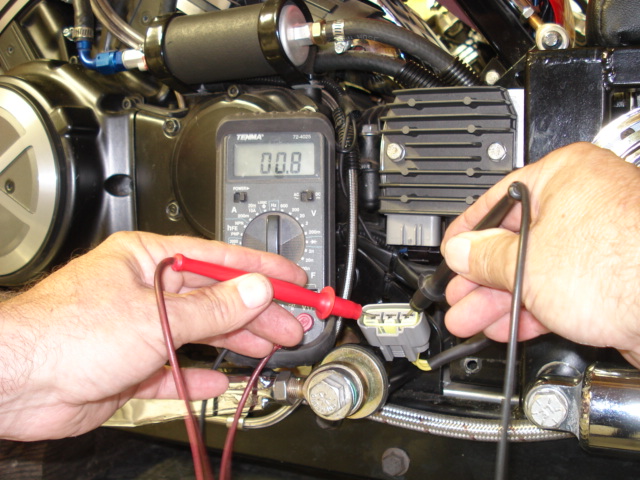
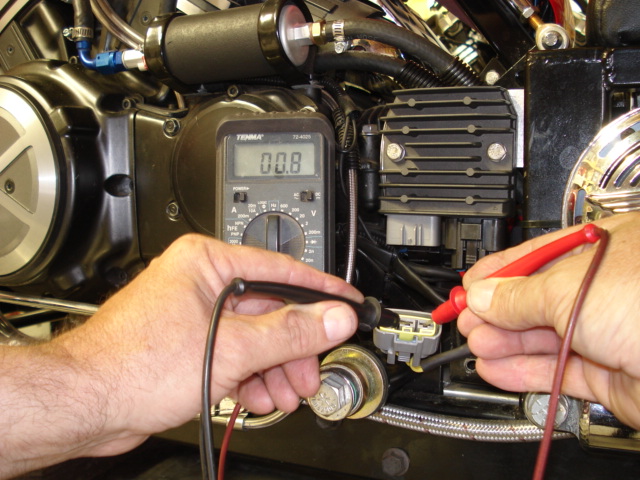
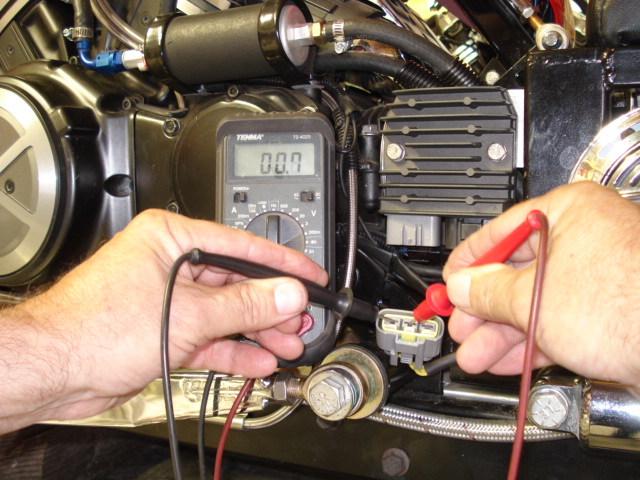
Besides the checks above you will also need to connect one probe to
ground (engine case or bolt head) and
check each stator terminal to make sure you have infinite resistance or no
reading on your meter. If you do get
a reading when doing this it is indicating that you have a shorted stator
winding, which means it is touching ground
and is shorting out your winding.
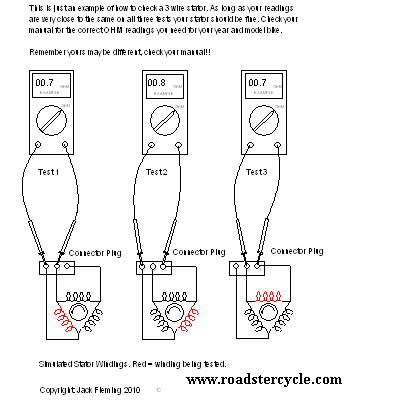
I am using a V-max stator as an
example, check your bikes
service manual for the correct way to check your stator!!
Checking your
stator is the first step. I'm using my V-max as a demonstrator for this.
Unplug your wiring from your stock regulator
and use a volt/ohm meter to check it. Switch your meter to Ohms, you'll
be reading under 10 ohms most likely. There are 3 wires that you have to
check. You check the resistance or ohms between 2 wires. Meaning all
combinations of the three. On the 3 different stators I checked I got
between 0.6 and 0.8 ohms between the 3 combinations. I checked the Yamaha
manual and they said 0.42ohms plus or minus 15% @ 20 degrees C or 68
degrees F. So I figure that if you have between 0.38 and 0.85 ohms
between the combination of the 3 wires you should be fine. Check your
bikes manual for your resistance numbers. I wouldn't
run out and buy a new stator because one of the stators I checked was brand
new from Yamaha and it did not meet their specs but works perfectly. If
you have no resistance or high resistance between any pair you should
pull your stator and visually inspect it for burnt sections. And if you
see dark discoloration (not just from being submerged in oil) on about a
third of it then you can run out and buy one. And since you are doing it
anyway you might as well buy a high output stator, it's only a few
dollars more. In the figures below the ohm meter reads 0.8 on the first
2 and 0.7 on the last 1. They were all fluctuating back and forth
between 0.7 and 0.8. It's just because of the moment the camera took the
picture is why they are not all the same. Remember besides this test,
check every stator wire for a short to ground, meaning one end of your
test probe to a bare of your engine cast and the other to a stator
terminal you should get no reading. If you do one of the windings is
shorted to ground which means a stator problem.
Check all combinations between the 3 wires to get your ohm readings.
Also check your 3
wires for a short to ground. Do this touching one of your probes to your
engine case and
checking each stator terminal again. You should have no reading on your
meter. If you do
you have a stator problem. Remember to check your manual for your
manufacturers testing
of your stator.
|